


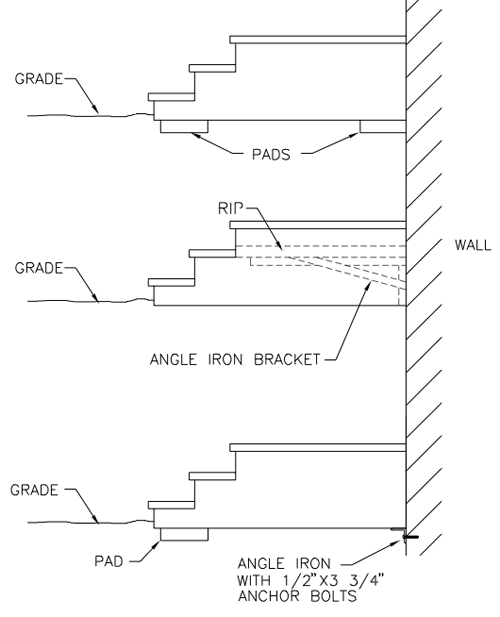
A Guide to WPC Wall Cladding
April 6, 2022What Is WPC Exterior Wall Cladding
April 17, 2022
Your New Deck’s Best Friend: Why WPC Decking Is Changing the Game
Let’s talk about the decking revolution that’s been sweeping neighborhoods lately. WPC (Wood Plastic Composite) decking isn’t just another building material – it’s like the smartphone of outdoor surfaces. Imagine combining wood’s natural charm with plastic’s toughness, then adding some secret sauce for good measure. I’ve installed enough decks to tell you this: once you try WPC, you’ll wonder why you ever messed with regular wood.

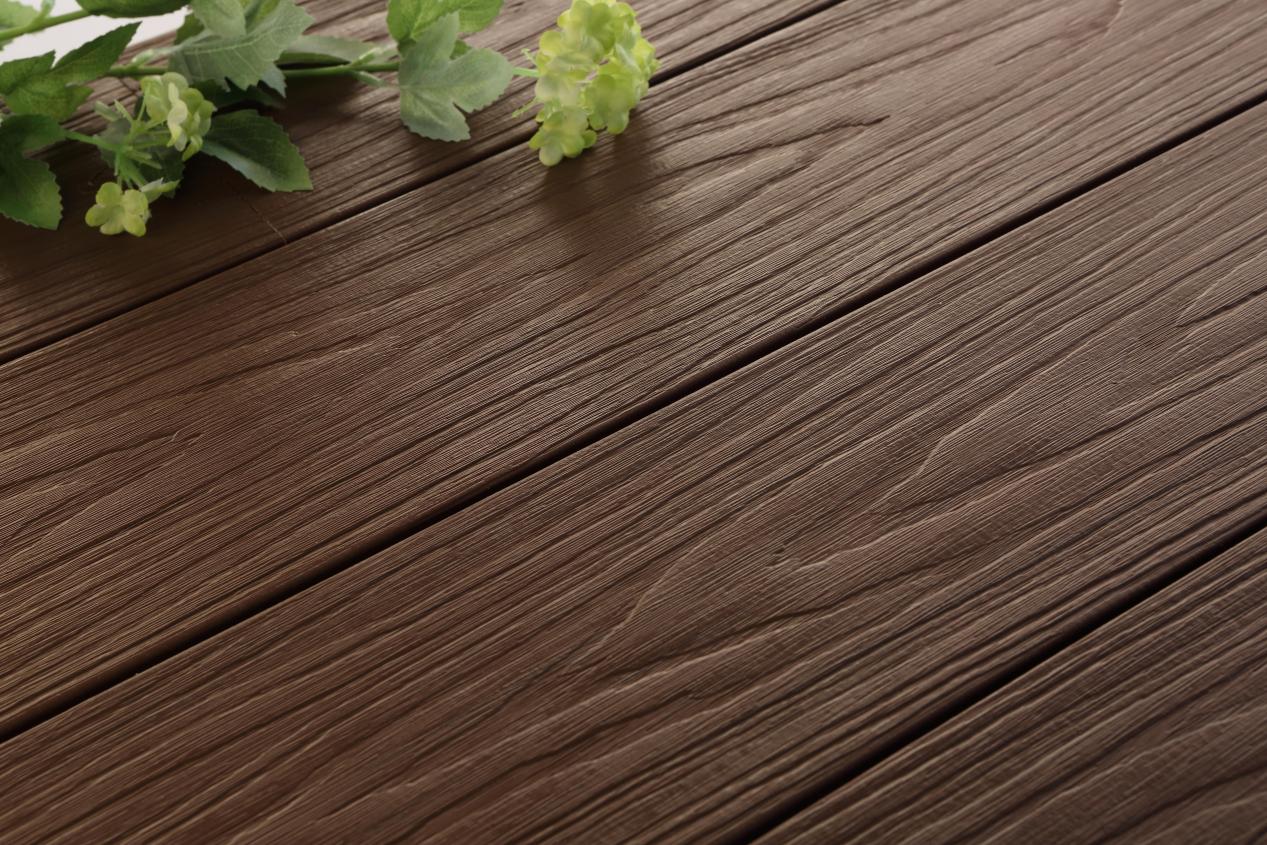
What makes WPC decking stand out? First off, it’s made from recycled wood fibers and plastics – eco-warriors love that. Unlike traditional decking that warps faster than a popsicle in July, WPC maintains its cool through rain, sun, and foot traffic. I remember a client’s cedar deck that needed yearly staining; their new co-extruded WPC deck? Just an occasional hose-down.
Here’s the kicker: no splinters! That alone sold my neighbor on WPC when her kids wanted to go barefoot. The composite material resists moisture better than treated lumber, and you won’t find any hidden nails waiting to ruin your flip-flops. Maintenance? More like ‘set it and forget it’ compared to wood’s constant demands.

Let’s break it down real quick:
- Longevity: Outlasts wood 2-to-1 easily
- Weather Resistance: Laughs at rain and UV rays
- Eco-Friendly: 60-70% recycled materials typically
- Safety: Naturally slip-resistant surface
Ever tried scrubbing mildew off wood decking? Not fun. With WPC’s capped surface (especially the premium co-extruded versions), dirt wipes off like magic. And color options? Let’s just say you could match your deck to your favorite coffee mug if you wanted.
Here’s the million-dollar question: Why settle for materials that need babying when you can have something that actually works with your lifestyle? Whether it’s handling poolside splashes or surviving winter freezes, WPC decking keeps your outdoor space looking sharp without the drama.
When prepping for your WPC decking project, you’ll want to gather your gear like you’re packing for a weekend DIY adventure. Let me share what’s worked best in my experience – starting with the tools that’ll become your new best friends.
 A solid circular saw tops my list – composite materials cut differently than regular wood, and I’ve found carbide-tipped blades last three times longer than standard ones. Don’t skimp on the drill either; you’ll want something with enough torque to drive screws through dense WPC boards without stripping them. Pro tip: Keep multiple drill bits handy as these composite materials can be tough on tools.
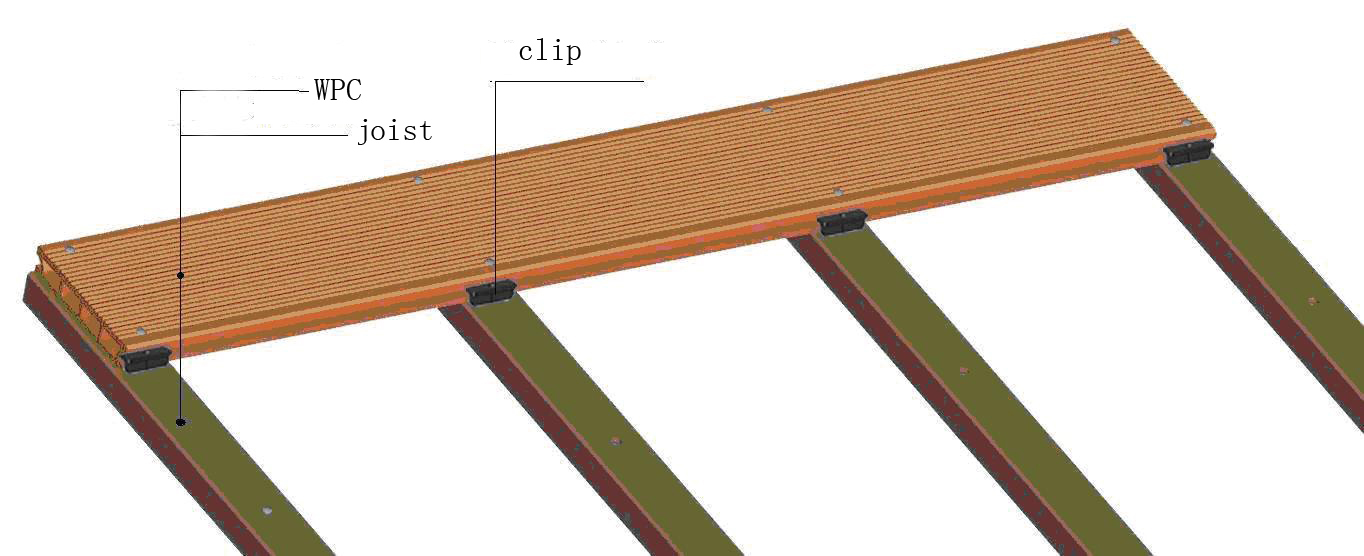
Now let’s talk fasteners – this is where many first-timers trip up. While standard deck screws might work for traditional wood, WPC requires specialized hidden clip systems to prevent surface damage and allow for proper expansion. I’m partial to stainless steel clips that won’t rust over time, though plastic composite clips can work for budget-conscious projects.
 Other essentials you might not think about: A good rubber mallet for snugging boards into place without marring the surface (learned this the hard way after scratching my first few boards), and spacers to maintain consistent gaps. Oh, and don’t forget high-quality exterior grade adhesive – it’s the secret sauce that helps prevent squeaky boards down the line.
Materials-wise, you’ll need about 10-15% more decking boards than your measured area for cutting waste. When selecting WPC decking, consider going with grooved-edge boards if you want that clean hidden fastener look. For substructure, I’ve had better results with aluminum joists compared to traditional wood – they don’t warp and create a more stable base, though they do add to the initial cost.
One common mistake I see? Using the wrong screws. You want self-tapping screws specifically designed for composite materials – they’ve got a unique thread pattern that reduces splitting. And here’s a golden nugget: Keep a tube of color-matched plastic plugs to cover any visible screw heads for that professional finish.
Get Your Site Ready Like a Pro
Let me share what I’ve learned from years of helping homeowners prep their spaces. That initial excitement to start laying decking boards? We all feel it, but trust me – rushing this stage leads to headaches later.
Measure Twice, Cut Once (Seriously!)
I’ve seen folks ruin $200 worth of co-extruded WPC decking by eyeballing measurements. Here’s my no-fail method: Use a steel tape (not that cloth one in your junk drawer) and measure diagonally both ways. Found a 1″ difference in a 12′ span last summer – saved my client from visible gaps!
The Clean Slate Secret
Remember helping me clear my cousin’s backyard last fall? That’s the energy you need. Remove EVERYTHING – stray nails, old mulch, even tiny pebbles. I keep a magnetic sweeper handy for metal debris. Pro tip: Slope the ground 1/4″ per foot away from your house – future you will thank us during rainstorms.

Drainage – The Make or Break Factor
Ever seen a deck pool water like a kiddie pool? We fixed one last month using French drains and moisture-resistant spacers. Leave 5/8″ gaps between joists for airflow – mold hates that! For heavy rain areas, consider adding a second drain pipe. What’s your local rainfall like? Adjust accordingly.
Want to see how proper prep makes installation smoother? Check out these before-and-after shots from our recent projects. Takes more coffee breaks upfront, but saves months of frustration!
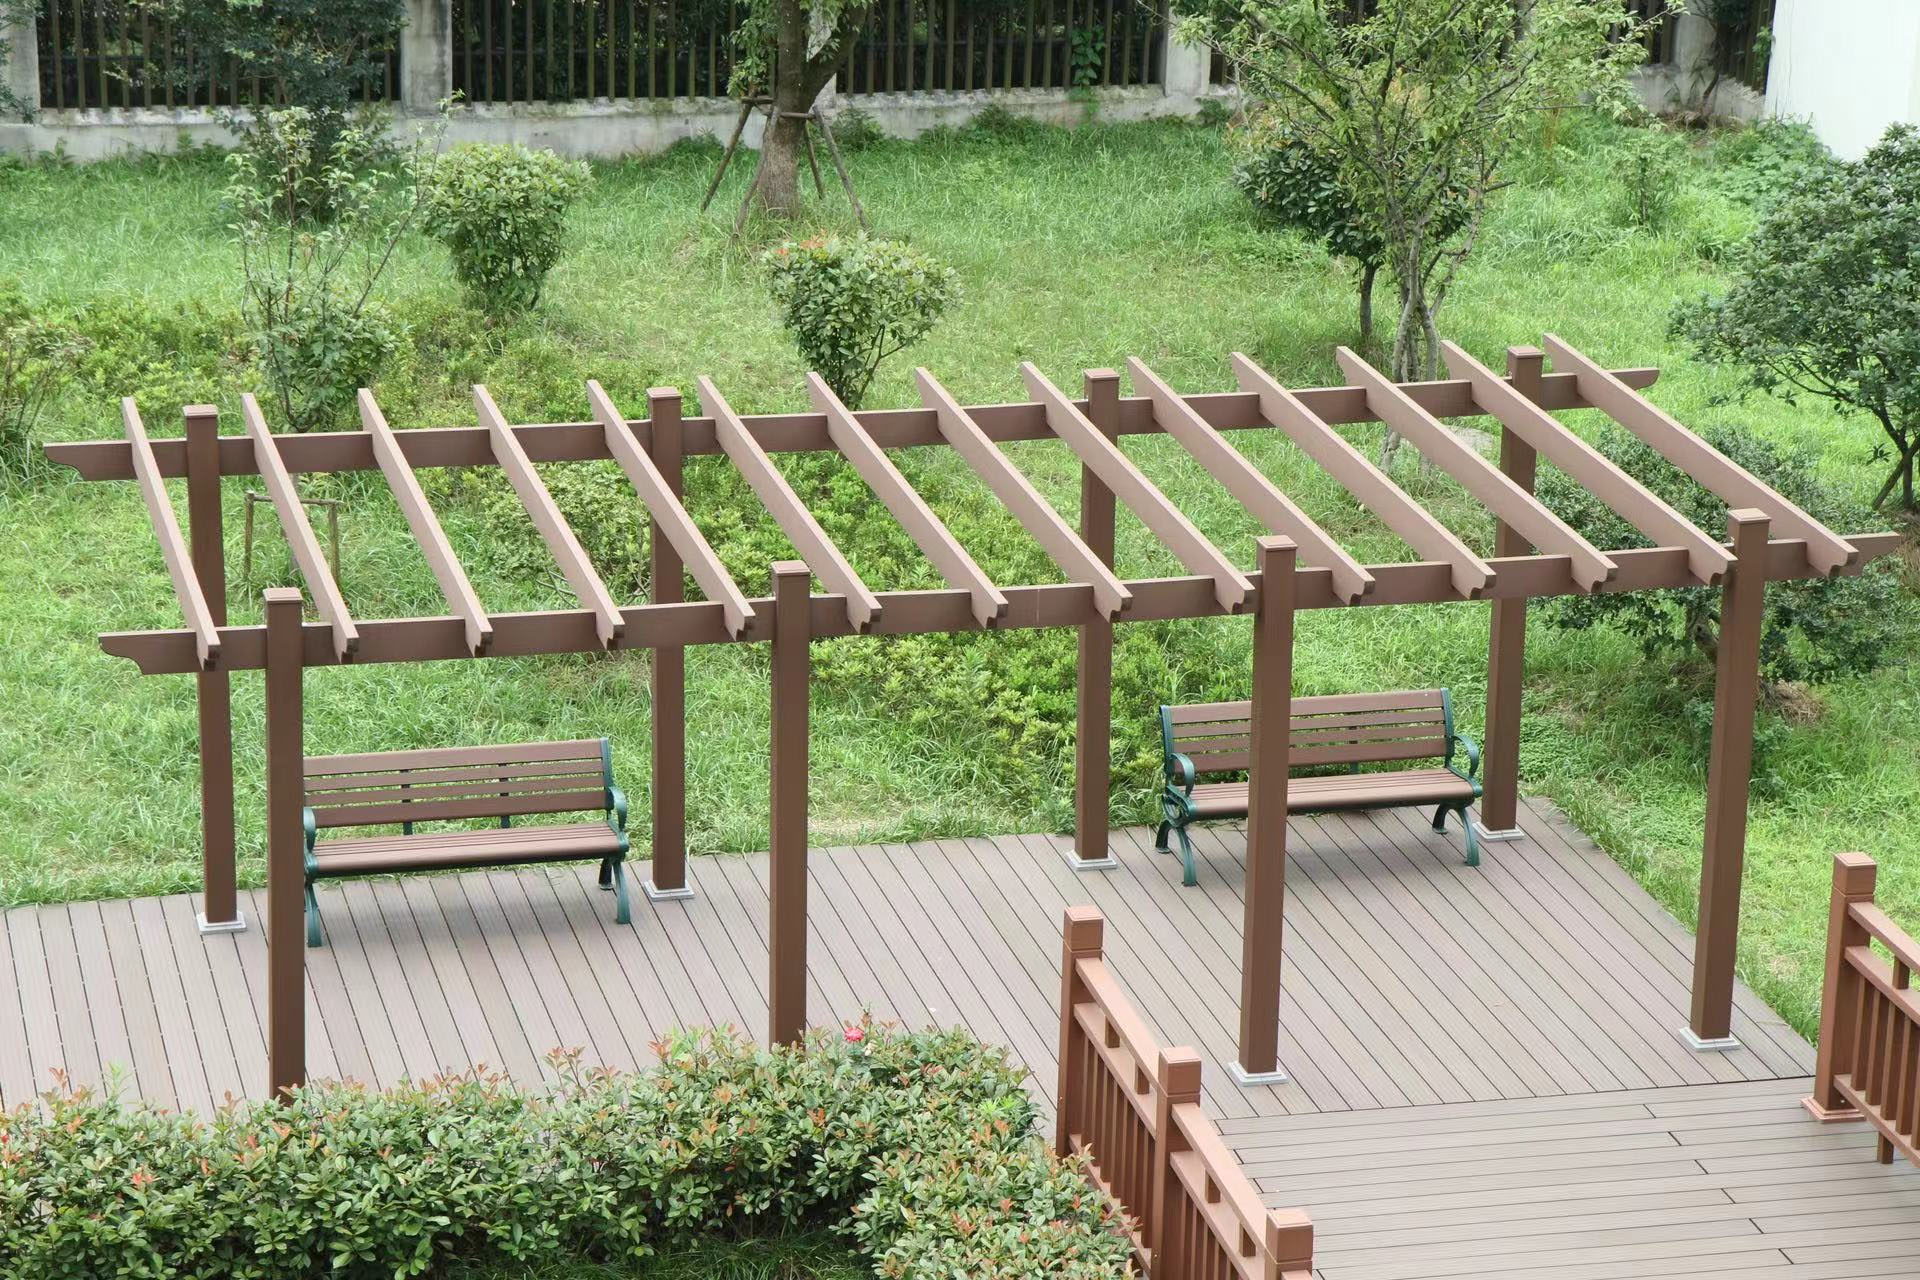
Let’s Get Those Boards Down: A Real-World Guide to WPC Deck Installation
Alright, let’s roll up our sleeves – this is where the magic happens! I’ve installed enough composite decking to know that perfect first board sets the whole project up for success. Start by positioning your starter board at the outer edge, leaving about 1/4″ gap from the house for expansion. Pro tip: use those plastic spacers that come with co-extruded WPC boards – they’re lifesavers for maintaining consistent gaps.
When securing boards, I always recommend stainless steel screws over hidden clips for DIYers. Why? Because let’s be honest – getting those hidden fasteners perfectly aligned can test anyone’s patience! Drill pilot holes at 45-degree angles through the board edges, keeping screws about 1″ from each end. Heard the horror story about warped boards? That’s usually from over-tightening – stop when the screw head sits flush with the surface.
Here’s where most folks trip up: staggering the joints. Instead of creating a perfect checkerboard pattern (which looks too manufactured), alternate board lengths randomly. I keep cut-offs from previous projects specifically for this purpose. And don’t forget to check for crowning – that slight curve in some boards. Always install them crown-up, like how you’d arrange shingles on a roof.
The finishing touches make all the difference. Run a bead of color-matched silicone along exposed cut ends – it’s like sunscreen for your deck’s vulnerable edges. For railings, here’s a trick I learned the hard way: install post sleeves before laying the final perimeter boards. And that satisfying moment when you snap in the last board? Resist the urge to jump for joy just yet – give the whole deck a thorough once-over with a rubber mallet to seat all connections properly.
Remember, composite decking needs to breathe. Keep at least 3/8″ clearance around permanent structures, and never skimp on those expansion gaps between boards. I’ve seen decks buckle because someone thought ‘close enough’ counted – trust me, it doesn’t. Got questions about specific tools or techniques? Drop them in the comments – happy to share more hard-won installation wisdom!
Let me share what I’ve learned about keeping WPC decking in top shape – it’s easier than you might think but has a few tricks I wish I knew sooner. That beautiful composite surface needs care like anything else, though I’ll admit it’s way less fussy than my old wood deck ever was.
 Start with simple sweeping. I keep a soft-bristle broom by the patio door for quick passes. For tougher grime, warm soapy water works magic. Pro tip: Use that leftover deck board cut-off as a scrub pad – the composite material won’t scratch itself!
When summer BBQ season hits, wipe up grease spills fast. I learned this the hard way when burger drips left ghost marks. A mild cleaner from plastory.com‘s maintenance line took care of it without fading the color.
Winter brings its own challenges. That first year, I panicked when snow piled up. Turns out plastic shovels are your friend – metal edges can nick the surface. For ice melt, stick to calcium chloride instead of rock salt.
 UV protection surprised me. While WPC resists fading better than wood, my south-facing sections benefit from an annual UV-blocking sealant. Co-extruded boards actually handle sun better – something I’ll consider for my next expansion.
Watch for thermal expansion gaps! I didn’t leave enough space between boards during installation, and summer heat caused some buckling. Now I check spacing every spring during deep cleaning.
Last thing – furniture pads matter more than you’d think. Dragging chairs without protection can leave scuff marks. A tube of color-matched repair compound from your manufacturer fixes most minor scratches.
When Your Deck Throws Curveballs: Real-World Fixes for WPC Installation Hiccups
Let’s be real – even with the best preparation, installing WPC decking can sometimes feel like assembling IKEA furniture without the picture manual. From mysterious gaps to stubborn boards that refuse to stay put, I’ve seen it all through years of decking installations. Here’s how to tackle those head-scratching moments that might make you question your DIY life choices.

The Case of the Bulging Boards: Ever installed your deck perfectly only to find bulges developing like bread dough? This usually means inadequate expansion gaps. Unlike traditional wood, co-extruded WPC decking needs breathing room – I recommend leaving at least 1/4″ between boards and 1/2″ along structures. Pro tip: Use plastic spacers during installation rather than eyeballing it.
Squeaky Clean Mystery: That annoying creak when you walk? It’s often hidden fastener systems not fully seated. Grab your rubber mallet and give the board edges gentle taps – you’ll hear the satisfying click when they lock into place. For persistent squeaks, a sprinkle of graphite powder works wonders without compromising the material.
The Great Color Debate: Notice slight color variations between batches? This isn’t a defect – it’s the natural character of composite materials. Mix boards from different bundles as you install to create a blended, organic look. Remember, sunlight will even out minor differences over time.
Pooling Water Woes: If puddles linger after rain, check your substructure slope. WPC needs at least 1/4″ per foot slope for proper drainage. I recently helped a client fix this by inserting tapered sleepers under their joists – problem solved without dismantling the entire deck!
When Boards Go Rogue: Warped boards straight from the packaging? Lay them in sunlight for 2-3 hours – the material’s thermal memory often does the trick. For stubborn cases, reverse the board’s orientation during installation. The team at Plastory recommends their UV-stable boards for areas with extreme temperature swings.
One golden rule I’ve learned? Never force boards into position. If it’s not fitting smoothly, stop and troubleshoot – you might need to adjust the hidden clip system or check for debris in the groove. What seems like extra work upfront saves countless headaches down the road. After all, proper installation is like giving your deck a fighting chance against the elements!