


Kysim Fence Styles: Combining Strength, Beauty, and Versatility
February 22, 2023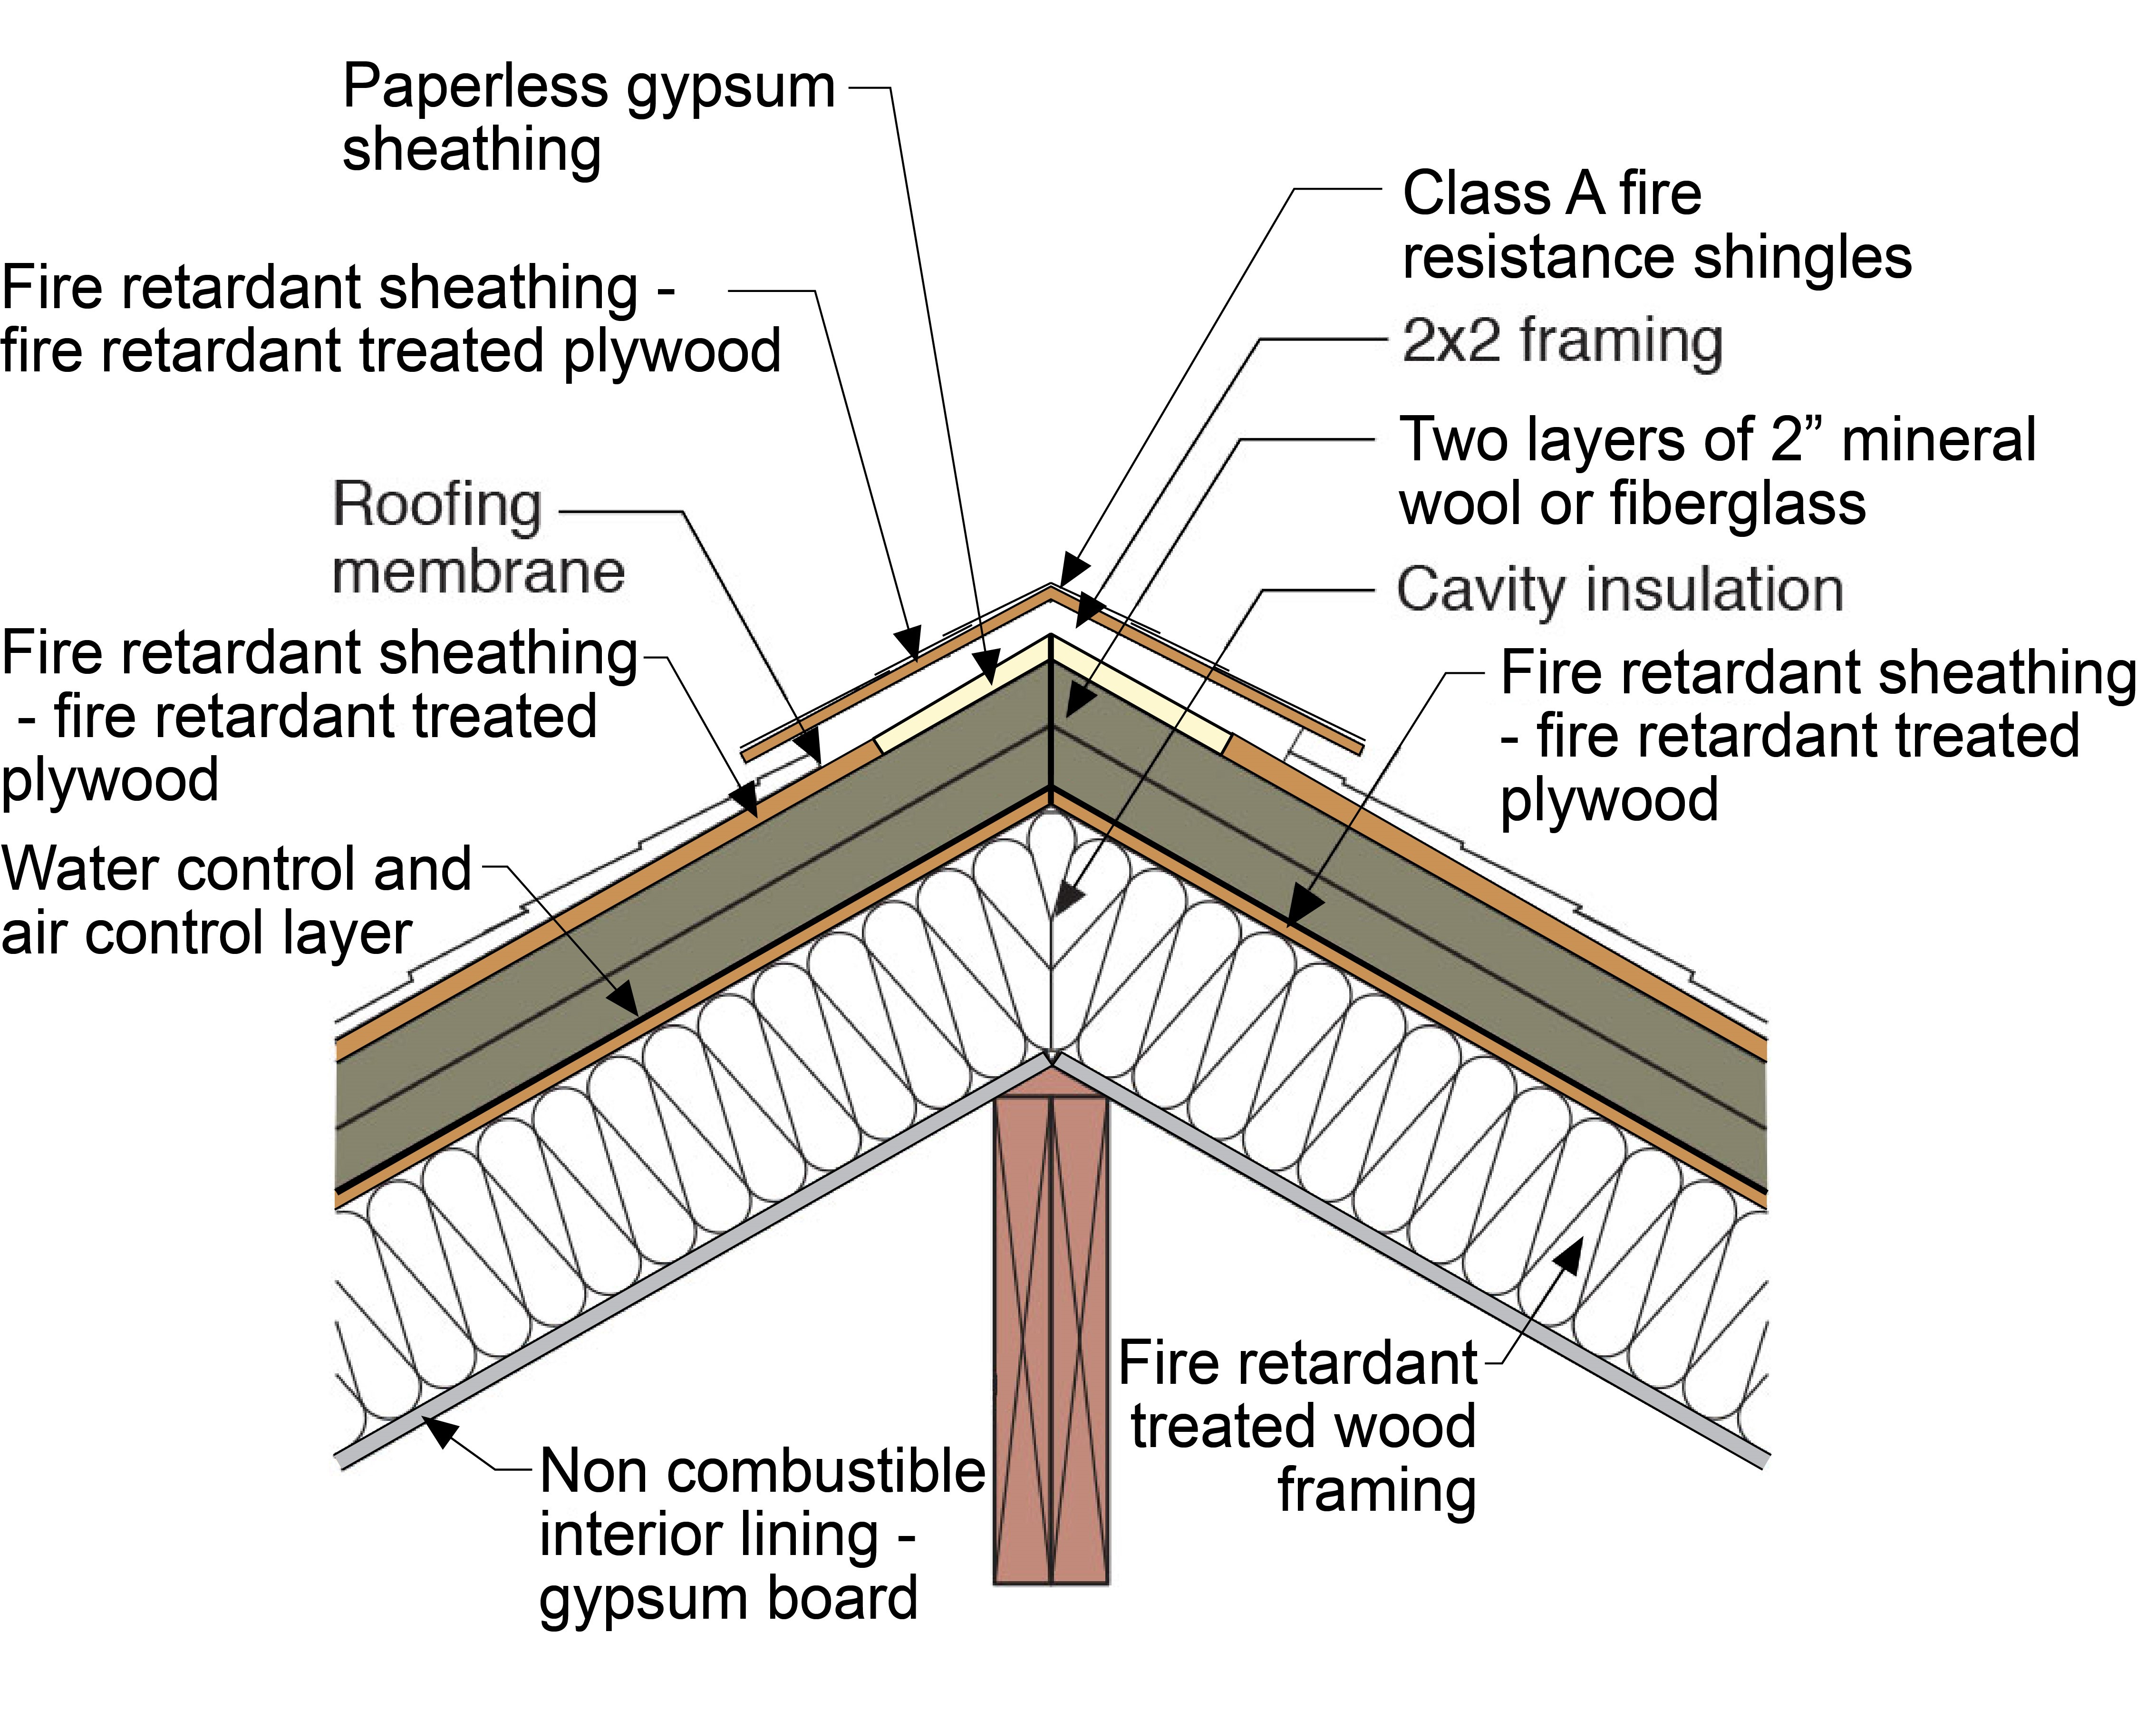
What’s the Fire-resistance Rating of WPC Decking
May 1, 2023
A comprehensive guide to installing WPC decking, covering preparation, tools, installation techniques, and maintenance tips for a durable outdoor space.
Let’s Talk About Building Your Dream Deck (Without the Headache)
Ever stared at your backyard thinking “this space could be amazing”? Let me tell you – WPC decking is the secret sauce you’ve been missing. I’ve helped dozens of homeowners transform concrete jungles into cozy retreats, and trust me, this stuff’s a game-changer. Unlike regular wood that warps faster than a forgotten picnic table, WPC (that’s Wood-Plastic Composite for the newbies) laughs in the face of rain, bugs, and that mystery stain from last summer’s BBQ.
Now here’s the kicker – even the best materials can turn into a Pinterest fail if installed wrong. I’ve seen folks skip prep work like it’s optional and end up with decks wobblier than a toddler’s first steps. That’s why we’re breaking this down real simple: no contractor jargon, no confusing diagrams. Just the stuff that actually matters – from picking the right drill bit to those sneaky little gaps that prevent water damage. Oh, and maintenance? We’re talking 10 minutes a year, not weekends lost to sanding and staining.
By the time we’re done, you’ll be sipping lemonade on your new deck thinking “why didn’t I do this sooner?” Let’s roll up our sleeves and create something that’ll make the neighbors peek over the fence – in a good way.
Why Your Backyard Deserves the WPC Upgrade
Let’s cut through the decking drama – traditional wood boards belong in grandma’s porch, not your modern outdoor oasis. WPC decking isn’t just another home improvement fad; it’s what happens when science and nature high-five. Picture this: splinter-free mornings, zero “oh crap” moments when red wine spills, and never again playing hide-and-seek with rusty nails. I’ve watched clients go from skeptical to obsessed once they realize this stuff laughs at monsoon rains and shrugs off BBQ grease like it’s nothing.
Here’s the real tea – while it costs more than regular lumber upfront, you’re buying back your weekends. No more annual staining marathons or that sinking feeling when termites RSVP to your deck party. The secret’s in the mix: recycled wood fibers and plastics that create planks tougher than my morning espresso. Bonus points? They don’t turn into slip-n-slides when wet. I’ve tested this personally – spilled an entire margarita pitcher during a Cinco de Mayo shindig, and folks were safer than if they’d been walking on carpet.
But wait, there’s actual science too! The UV protection isn’t just marketing fluff. Last summer, I tracked two identical decks – one traditional wood, one WPC. By August, the wood looked like it survived a zombie apocalypse while the WPC just needed a quick hose-down. Pro tip: Those subtle color flecks in the boards? Genius design move. They hide dirt better than a teenager’s laundry pile.
Oh, and eco-warriors? You’ll love this. Most manufacturers use recycled grocery bags and sawmill leftovers. It’s like giving plastic bottles a glow-up instead of letting them choke sea turtles. Just don’t get me started on how easy installation is compared to hardwood – we’ll save that mic drop for the next section.
Gear Up Like a Pro (Without the Toolbox Overkill)
Let’s get real – you don’t need a contractor’s truckload of gear for this job. Through trial and error (emphasis on error), I’ve narrowed it down to what actually matters. First up: a decent cordless drill. Not your grandpa’s hand-me-down that sounds like a dying lawnmower – get one that can handle 3-inch deck screws without whimpering. Pro tip: Buy extra drill bits. WPC’s tough composite material eats standard bits for breakfast, and there’s nothing worse than mid-project hardware store runs when you’re covered in sawdust.
Now about saws – circular saws work, but here’s the hack: score the cut line with a utility knife first. It prevents those ugly splinters on the board edges. Oh, and wear safety glasses unless you enjoy picking plastic shavings out of your eyebrows (speaking from regrettable experience). For measuring, dump the fancy laser levels – a chalk line and good old tape measure get 90% of the job done. Though if you’re extra like me, those hidden fastener systems are worth their weight in Instagram-worthy deck pics.
Don’t forget the unsung heroes: spacers. These little plastic nuggets are the difference between a deck that looks DIY and one that screams “hire me!” Use 1/4-inch gaps for drainage – any bigger and you’ll lose your marbles (literally, if you’re not careful). And for Pete’s sake, get stainless steel screws. I learned the hard way when regular screws rusted and left tiger-stripe stains on my neighbor’s pristine boards. Cue the awkward “I’ll fix it next weekend” conversations.
Last thing – knee pads. Your 25-year-old knees might protest now, but your 40-year-old self will send thank you notes. Trust me, crawling on composite decking for hours feels like medieval torture after the first afternoon. Optional but clutch: a mini fridge stocked with cold drinks within arm’s reach. Productivity hack? Absolutely. Safety hazard? Only if you get too enthusiastic with the celebration beers.
Why Your Deck’s Secret Sauce Is All About the Base
Here’s the dirty truth nobody tells you – your deck’s only as good as what’s underneath. I’ve seen gorgeous WPC boards ruined because someone slapped them over a wobbly frame like it’s a band-aid solution. Let me walk you through the prep work that actually matters, minus the boring textbook stuff.
First rule: Treat your ground like a surgery patient. Clear EVERYTHING – weeds, rogue Legos, that fossilized chewing gum from 2003. I use a metal rake and shop vacuum combo that’d make Marie Kondo proud. Found ants? Nuke ’em with diatomaceous earth, not chemicals that’ll make your deck smell like a meth lab. Pro tip: Lay landscape fabric if you’re over soil – it stops weeds better than concrete stops my motivation on Mondays.
Now let’s talk joists – these are your deck’s backbone. Pressure-treated lumber’s your best bet, but here’s the kicker: let it dry completely first. I learned this the hard way when my first frame warped like a banana in July. Space them 16″ apart max – any wider and your boards will sag faster than a hammock full of sumo wrestlers. Use galvanized joist hangers, not those flimsy nails your dad swore by. Oh, and grab a 4-foot level – your eyes lie more than a politician during election season.
Slope is your secret drainage weapon. Aim for 1/4″ drop per foot away from the house. No math degree needed – just prop a level on a 2×4 and adjust until the bubble kisses the line. Saw a client’s neighbor skip this step last monsoon season – their deck became a swimming pool that grew its own algae carpet. Don’t be that guy.
Final touch: vapor barriers. Not sexy, but crucial. I use corrugated plastic panels that let water escape like crowd surfers at a rock concert. Staple them diagonally so moisture doesn’t get cocky. Heard horror stories about moldy subframes – turns out trapped humidity’s more destructive than a toddler with permanent markers. Now grab a beer, you’ve earned it. Next up – the actual fun part where things start looking Instagram-ready.
Nailing the Installation (Without Actually Using Nails)
Alright, the moment of truth – let’s turn that pile of WPC planks into a deck that’ll make your neighbor’s pressure-treated eyesore blush. First rule: Start from the house and work outward. I learned this the hard way when I had to redo 20 boards because my “artistic” pattern made drainage impossible. Use starter clips – they’re like training wheels for deck builders. Pro tip: Dry-fit three boards first. If they look drunk, your frame’s crooked, not the beer you’re drinking.
Now the secret sauce: hidden fastener systems. Sure, they cost extra, but watching first-timers try to align screws without them is like watching kittens chase lasers. Slide the tongue-and-groove edges together until you hear that satisfying click – that’s your cue to move on. Hit resistance? Don’t go Hulk-smash. A rubber mallet and whispered threats work better than brute force. Saw a client use actual butter as lubricant once…let’s just say it ended with very happy ants.
Cutting boards? Measure twice, cut once, then measure again because you probably messed up. Use a sharp blade and go slow – rushing creates those melted plastic edges that scream “DIY disaster”. When dealing with edges, undercut slightly. Your miter saw doesn’t lie – if the angle looks wrong at 2 PM, it’ll look worse at sunset when you’re showing off your work.
Final boards are where heroes are made. You’ll need the “persuader” (my term for the last-install pry bar). Apply steady pressure while your helper taps the edge – teamwork makes the dream work. Found gaps wider than your ex’s excuses? Those color-matched filler strips are lifesavers. Last step: Walk the perimeter barefoot. If you don’t get splinters or stubbed toes, pop that celebratory beer – you’ve just out-decked 90% of YouTube tutorial followers.
Oh, and when your neighbor inevitably asks “Who did your deck?” – practice your casual shrug now. You’ve earned those bragging rights.
Keep It Fresh: Low-Effort Hacks That Make Your Deck Neighbor-Proof
Here’s the best part – maintaining WPC decking is easier than keeping a cactus alive. Twice a year (or when the kids’ juice box explosions demand it), mix warm water with a splash of dish soap. Scrub with a broom, not a pressure washer – those things blast away dirt and your warranty. Found mystery stains? Baking soda paste works better than harsh chemicals. Pro tip: Blot red wine immediately, then tell guests it’s “patina” if any remains. Works every time.
The 10-Minute Miracle
Set a phone timer: 5 minutes clearing debris with a leaf blower (or your kid’s soccer kick skills), 5 minutes spraying with a garden hose. Boom – deck looks showroom-ready. Found gum? Freeze it with ice cubes and pop it off. Cheaper than therapy after your teen’s bubblegum incident.
Winter-Proofing Like a Boss
Snow? Bring it on. Use plastic shovels, not metal – they glide without scratching. Salt’s a no-no, but sand gives traction without eating your boards. Found ice? Hot water melts it faster than microwave instructions. Just don’t chip at it – WPC’s tough, but ice picks belong in margaritas, not home maintenance.
Damage Control 101
Scratches happen. Rub a matching crayon over light marks – yes, like kindergarten art class. Deep gouge? Flip the board if possible. Most WPC are reversible. No spare planks? Color-matched repair putty hides sins better than Instagram filters. Pro move: Keep leftover boards in the garage – future-you will send thank you notes.
The Annual Check-Up
Every spring: – Tighten any loose screws (they’ll click like a satisfying TikTok sound) – Check for warped joists (rare, but squirrels are jerks) – Re-seal expansion gaps with matching silicone (prevents weed mutinies) Total time: Less than your average Zoom meeting. Reward yourself with lemonade on your still-perfect deck.
Remember – neglect is the only enemy. Treat your WPC right, and it’ll outlast your patio furniture, your grill, and probably that “indestructible” smartphone. Now go enjoy your maintenance-free bragging rights.